
Auto Captions automatically adds emojis to your subtitles, but sometimes the suggested emoji doesn’t fit your content. Here’s how to swap any emoji in seconds — no manual keyframing, no timeline diving.
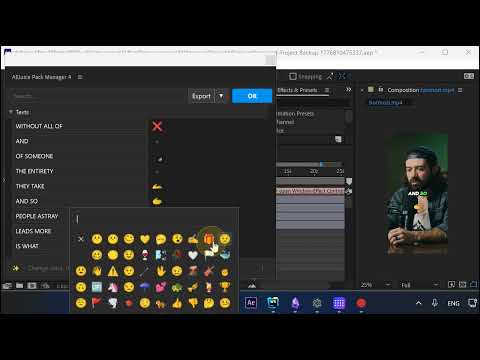
Step 1: Open the Caption Editor
Select your captions layer and click Edit to launch the caption editor. This opens a panel where every word and its associated emoji is shown side-by-side.
Step 2: Find the Emoji You Want to Change
Each line of text shows its current emoji on the right. Click any emoji to jump the preview directly to that moment in your video, so you can see exactly which scene you’re editing.
Step 3: Pick a Replacement
Once you click an emoji, a picker appears with alternatives. Select a different one and it’s instantly applied to your timeline — no rendering, no extra steps.
Step 4: Use Search to Find Emojis Faster
Scrolling through hundreds of emojis is slow. Type a keyword in the search bar and only matching emojis show up, making it easy to find the exact one you need.
A Note on the Preview
Emojis appear static in the editor preview, but they animate normally on your actual timeline once applied. Don’t worry if they look frozen in the panel — they’ll come to life in your final render.
Wrap Up
Editing emojis in Auto Captions takes seconds and keeps your captions expressive without manual work. Try Auto Captions free on AEJuice.